

Bow Tools you can make...and how to use them
©Dean Torges/The Bowyer's Edge™
"Any activity becomes creative when the doer cares about doing it right or doing it better."
Organic bows don't require the inventory of tools and jigs that their laminated brothers regularly employ. No need for thickness or oscillating sanders or for air hoses and bow forms. In fact, hand tools of various sorts employed by the skilled bowyer yield more precise results than power equipment can hope to achieve. Just as the dovetail saw employed by a skilled cabinetmaker creates hand-cut joinery that outstrips its machine-made cousin by every measure, so, too, do the bowyer's results lie with the thoughtfulness of his tools and in learning their skillful use.
Some existing hand tools can be modified to advantage for a particular job; others can be made wholesale from materials at hand to suit a purpose. Beyond the rasps, saws and scrapers which we purchase lie the finesse tools we ourselves create to smooth our path, to solve the problems we encounter. They are characteristically cheap, easily made or modified, and invaluable for the assistance they lend us. Here's a look at some from my tool chest.
Dips and Do's
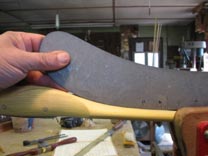
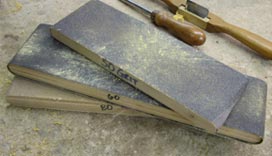
Negotiating the dips successfully, moving from static to dynamic wood smoothly in a short span, usually creates the greatest challenge for the novice bowyer. Witness that most chrysalling occurs in the near handle area. This simple sanding block will smooth any washboarding between growth rings so that the transition flows as evenly as your care allows.
A block of wood approximately the length of a quarter sheet of sandpaper and the width of that sheet folded equally three times will provide you a means to finesse the dips. Use a French curve or a facsimile, such as the oval lid of a box, to profile your dips and the flares inside your handle area, and transfer these shapes to your block. Coupled to an 80 grit paper, the sanding block pictured here can be used to smooth any concave surface on any bow I build, one side for the dips, the other for the flares inside the handle area.
You can glue cork gasket material or thick felt to each face, but a tri-folded quarter sheet makes that an unnecessary cushion.

A Matter of Record
I maintain several journals for bows I've built, logging one for selfbows and one for backed or laminated bows. They provide an important reference source, containing information about dimensions, characteristics of the wood, forms used, lamination thicknesses, bamboo variety, notes about green profiles, finishes used, problems encountered, solutions devised, goals intended, diagrams, weights, purposeful changes and deviations from the past—whatever is relevant to each bow's creation. These books lie open and accessible on my workbench at bow time. Most of us do something similar, and most of us stop there.
If you believe that tillering is the most important skill of the bowyer's craft, then a fingerprint record will provide you a profound opportunity to develop that craft beyond any journal you can keep. It requires only a short length of butcher paper, a straight slat of wood to register a baseline for your bowstring, and a felt-tip marker.
After you've worked a stave close to its desirable form, place the braced bowstring against the slat and trace it and both limbs, one superimposed upon the other. Mark the divergences, the stiff spots and the weak spots of one limb compared to another as they approach your ideal. Work to harmonize them, removing wood from strategic places, working the limbs until they understand what you did, and then retracing them so you can understand what happened.
Of course, you also need to see through any natural irregularities in the limbs while bringing them together, and you need to keep after it until the bow at full draw reaches your ideal. As stated in Hunting the Osage Bow, no judgment is more critical than your own practised eye upon the fully drawn bow. All others methods and measurements are subject to it, servants to its cause.
Once you arrive at tiller and the bow has been shot in to your satisfaction and behaves like you hoped, trace the bow's fingerprint, it's unique braced profile, just as described in Hunting the Osage Bow. Any deviation from that fingerprint during the life of the bow will reveal where you are weak in tillering. Keep checking the bow against its fingerprint in the early stages of its life, and make corrections before faults become dramatic. It only takes a few minutes. Check it thereafter at intervals, after approximately 1,000, 5,000 and 10,000 shots.
I can't stress the importance of an identity paper for a bow, a paper that tracks a bow's life after it's made. Date and record your observations on this same paper just as you would your vehicle's maintenance and repair log.
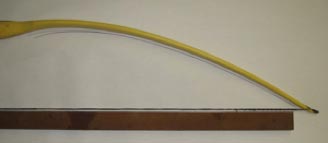
The exceptional fingerprint in the accompanying illustration was of a short selfbow made of matched billets. One of many advantages to matched billets is that the limbs are much easier to synchronize. As you can see, the upper and the shorter lower limbs are virtually identical.
You can also work for these kinds of results with backed or laminated limbs or with corrected full length staves. Full length character staves or unmatched billets are usually too dissimilar between limbs, but that reality does not detract from the value of fingerprinting, nor does it make these bows any less worthy if you are perceptive enough to see through their irregularities to the actual work the limb does.
The paper backside of this particular selfbow fingerprint reveals the journey toward tillered, synchronized limbs, where almost a dozen different pencil tracings were used to help the bow arrive at its destination. Discrepancies between the limbs were identified and remedied; the bow was worked and critiqued on the tillering tree, and the limbs were retraced until they came together for a final inking on the clean side of the sheet.
I have come to understand more about tillering organic bows and my own strengths and weaknesses as a bowyer through a large, wide roll of unfaced white paper retrieved from a photo shop dumpster, than through any other single resource. If you look forward to your next bow without looking back at your last bow, the bow you build tomorrow will look like the bow you built yesterday.
The Modified Calipers
Tillering by facets gives you control not only of the limbs and the handle, but of the dips as well. By assigning duties or work loads to the various facets, you never lose your place during the building process. Controlling the thickness facet on the crown of the belly allows you to influence bend precisely and systematically.
I scratched lines at right angles to each other across the center of the knurled adjustment screw of a pair of calipers. By proceeding with measured quarter turns down the length of both limbs, the calipers function as a go/no-go gauge, permitting me to evaluate taper, either from thickness or width. I don't use it much, but this modified tool is most welcome when tillering problems arise and the reasons lie hidden.
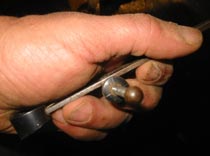
By providing information, calipered limbs can add another perspective to your work, especially if you've slowed to unsure, timid, steps.
The calipers can also function as a primitive micrometer, useful in measuring and recording the taper in a slat prior to bamboo glue-up. For example, assume that six quarter-turns down the length of the slat, from the handle area in both directions, glues into a tapered stave that's not too far off from the weight and the tiller that you prefer. Record the slat's thickness at the handle, the turns down the slat, and the position or the spacing between each turn. Evaluate the results in the finished bow, and use the calipers to either duplicate the measurements or to make adjustments on your next attempt.
You are not engineering a fiberglassed bow. The measurements are not critical. However, this practice will allow you to bend your stave evenly for glue-up while keeping the glue-line tensions balanced close enough to the finished bow's that removal of belly wood during tiller will not unpredictably alter the stave's profile.
A Jug of Water and Thou
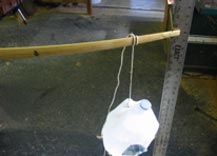
Sometimes a limb will move away from your layout while you are removing wood or drying it further, enough so that slimming one side of the nock end will not move the bowstring back to center. My solution utilizes a milk jug full of water.
Mark the offending area of the limb and the direction you want the limb to move, then clamp the bow securely in a vice. Tie the water jug to the limb and measure the distance from the tip to the floor with a plumb straight edge, either a ruler or a slat of osage marked with a pencil line. Heat the faulty section of limb while monitoring the ruler. When the limb sags by about 3/8" from its original registration, walk away and allow it to cool down.

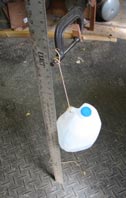
Sometimes a limb warps and winds. When it does this, place a C-clamp near the end and tie the water jug to the screw end of the clamp, using leverage to unwind the corkscrew while simultaneously correcting the warp. You may require additional hand leverage on the clamp to complete the mission once the tip has sagged, but that's easily decided by using the same measuring technique at the handle of the C-clamp as you did off the nock end.<
The Palette Knife
I've turned an artist's palette knife into a multi-tasker at glue-up time. It's an unassuming tool, but it's a versatile workhorse I wouldn't want to be without.
By cutting away the handle end and exposing the tang, I've created a can opener for prying up the Urac can lid. The knife blade functions to spoon catalyst into a measuring cup, and it also works as a stir stick to mix the resin and catalyst. One edge of the blade is filed slightly concave, the other is left straight. I use the straight edge to trowel glue into place on bamboo and osage slats. Once the glue is spread in approximately the right amount, the concave edge works to screed a thin, even, wet thickness down the entire length of the mating surfaces, leaving a slight crown to the middle. It's slick, quick, and accurate.
The end of the knife, which originally was rounded, is ground to a straight, slightly skewed angle. With this end I can dab, poke or finesse glue, or scrape away glue squeeze along joints, ledges, and even from corners. When the job is done and the glue has dried to the blade because I forgot to wipe it off, it functions as a litmus test. A putty knife will scrape it back to metal while assuring me by the glue's brittleness and "stick" of the success of the bond.
An Eye On the Belly
If you tiller according to HOB, assigning duties to facets, reducing weight on the outside belly facets and finessing tiller with the middle facet, then the next two tools help you patrol the middle facet, or belly crown, of the braced bow. The caveat here is that these tools work best when the stave flows smoothly. This usually occurs only when you're working with a selfbow stave that's been corrected of irregularites, or a laminated stave, such as one that's bamboo-backed.
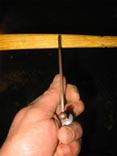
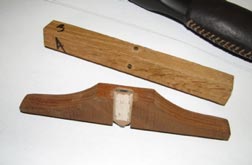
The first tool, which premiered in Hunting the Bamboo-Backed Bow, has become known as the "walkie-talkie" for the information it relays as it "walks" down the belly of the bow. It consists of four small brass screws, one in the middle of each face of a square piece of hardwood, 7" long. The tool spans the arc of the belly. Each screw sits proud of its face by a slight amount more than the next one, each one almost contacting the belly at various stages along its length, so that the proudest screw works best in the dip area, while the shallowest one, almost flush with its face, works toward the nocks. In relay fashion, the screws contact the belly, each in its turn, as you slide the tool from the dips toward the nocks.
Assume that you desire a gently decelerating arc in the braced bow. Slide the walkie-talkie along the belly crown toward the nock, starting with the proudest screw closest to the dip area. By keeping an eye on the changing gap between the screw head and the belly, or by noticing the rate at which one leg of the tool lifts or sags as the tool rides upon the screw head and the other leg, you can discover and mark the areas that require attention.
When the screw makes contact and one leg of the tool lifts and continues to steadily increase its distance from the belly as you move the tool down the limb, and so on with each successively shorter screw, you have achieved a decelerating arc.
On the other hand, if a screw head reveals a dip in the braced profile somewhere along the limb, and the unbraced bow does not exhibit a corresponding irregularity in its profile, then the walkie-talkie has discovered a potential hinge, however subtle.
A similar tool uses a carpenter's pencil that is friction fit into a dado in the middle of a 7" piece of stock. Instead of relying on four established screw heights, you can slide the pencil up and down the dado slot to match an area of a limb you wish to examine, and the pencil lead will mark the limb's stiff sections and skip over its subtle hinges.
Smoothing Up
Belts of various grits from portable belt sanders make inexpensive and ideal implements for mushing over facets, overriding uneven areas and generally bringing your bow limbs to a smoothly flowing harmony of movement. Mount them over a ¾" thickness of stock, plywood or solid, ripped to the width of the belt, cut to allow for a friction fit with the belt, the ends rounded to soften the strain on the belt.
The Cutting Edge
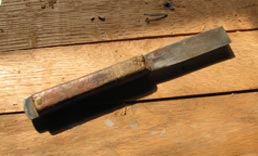
Panzar files, which were developed for automobile bodywork, can be adapted for a range of uses in bow building. They come in flat and half round shapes, flexible and stiff, and are designed to be screwed into and used in a tool frame. The flat Panzar is two-sided. When one side of the file becomes dull, unscrew it, flip it over, and use the other side. The teeth, numbering about eight to an inch, curve across the width of the file, like miniature milling cutters. Their extremely sharp edges leave behind a smooth, shaved, scratchless finish.
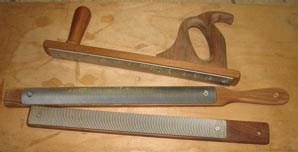
I have a half round and a flat screwed to a piece of stock and use them like a rasp. Though the Panzar does not have a wood rasp's versatility, it's unexcelled for cutting cleanly on the surfaces it fits. Another flat file is fashioned into a homemade specialty plane for two-fisted use. I don't use them often, but if you want to bring a stave or a bamboo backing to accurate outline with the flat files, or rough out the handle area without tearing wood using the half round, or if you're working horn or baleen, (or fiberglass, for that matter, so I've been told), or if you have a squirrelly area you need to smooth out precisely without roughing it up, you'd be hard pressed to find a better cutting edge. And you can also use one to put an adequate edge on a broadhead.
*****
None of these simple tools in itself guarantees results or offers shortcuts to the tillered bow. In fact, if you are in a race to make a bow, you should avoid them. But if building bows is a creative activity you want to do better, an art you want to learn, then increasing your skills while adding understanding and finesse will place you on the path to excellence. If you want to build the best bow you can possibly make, you'll look for the means to get you there, and you'll relish the problem-solving challenges which stand in your way—which means you'll soon be creating additions to your own bowyer's tool kit.
